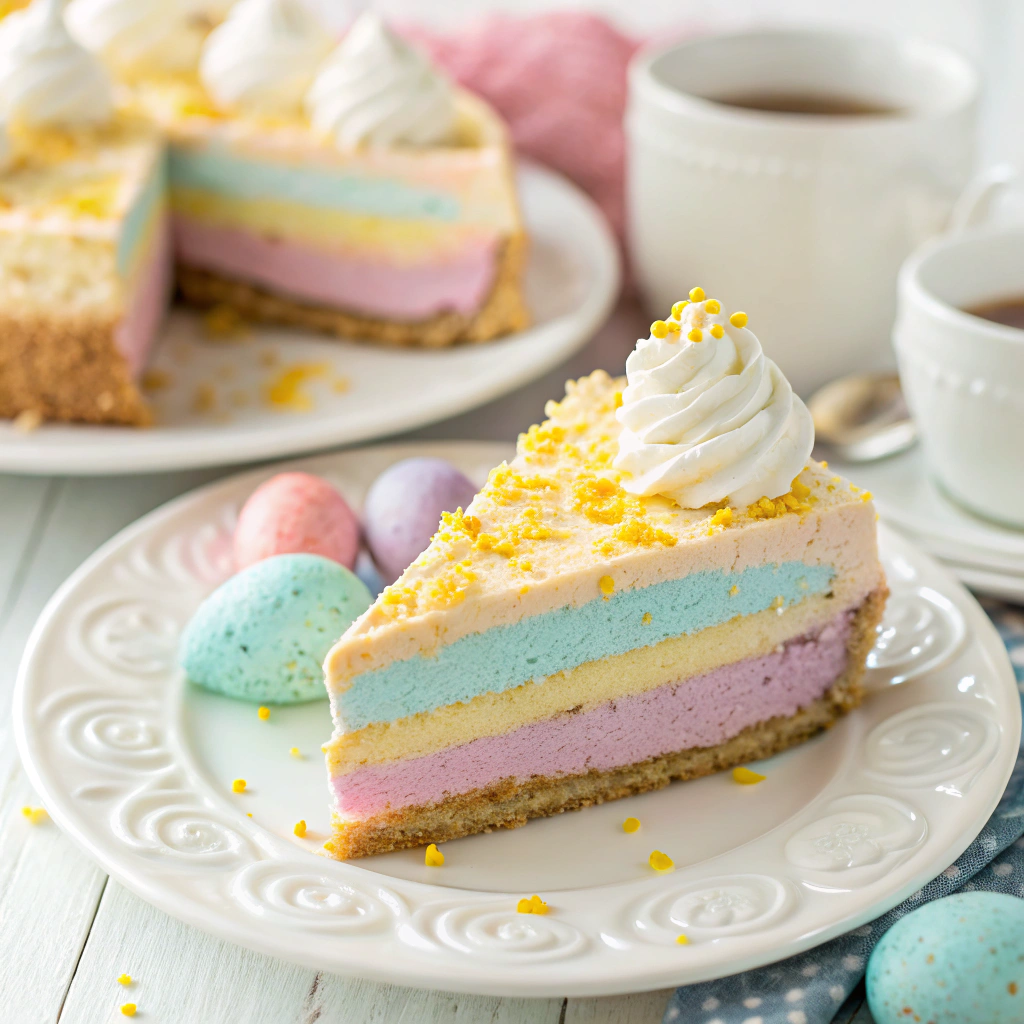
Springtime always brings such promise, and my obsession with pastel desserts peaks right around Easter. That’s why I’m so excited to share my easter jello pie recipe. This no-bake showstopper offers layers of creamy, colorful Jell-O nestled in a buttery graham crust. It’s playful, nostalgic, and jaw-dropping at every slice. Best of all, you don’t need an oven or fancy tools, just a little patience and a love for sweets. Whether you’re hosting brunch, sharing dessert with family, or just craving a taste of cheerful childhood, this easy Easter Jello pie will become your new holiday favorite.

The Story & Connection
Memory and Meaning
For me, Easter means big Brooklyn brunches, happy chaos, and desserts that spark joy. As a child, I remember my grandmother layering bowls of Jell-O, each hue glowing under her kitchen light. Now, I recreate that magic with my easter jello pie recipe, blending old-school charm with fresh, creamy twists. Each layer is like a memory, stacked together in a single slice. It’s silly, sweet, and perfectly suited for every age at your holiday table.
Kitchen Context and Emotion
Colorful desserts have a special way of transforming a gathering. In my Brooklyn kitchen, prepping this pie feels almost meditative. The bright bowls cool, whipped cream folds in, and each layer snuggles into the next. The scent of buttery grahams, the sight of pastel swirls, and the first bite, light yet luscious, make it a soulful addition to your Easter spread. If you love easy no-bake treats, don’t miss my easy no-bake pecan praline cookies too, a southern candy classic for your spring dessert table.
Ingredients List For Best Easter Jello Pie Recipe – Easy & Colorful Layers
For the Filling:
- ½ package Pink Starburst Jell-O (a little under 2 ounces)
- 1½ ounces Blue Jell-O (½ package)
- 1½ ounces Yellow Jell-O (½ package)
- 1½ ounces Purple Jell-O (½ package)
- 16 ounces Whipped Cream, divided
- 3 cups Boiling Water
- 1⅓ cup Cold Water, divided
- Yellow Food Dye (optional)
- Pink Food Dye (optional)
For the Crust:
- 2½ cups Graham Cracker Crumbs
- 12 tbsp Butter (1 ½ sticks)
Unique or Sensory Ingredients
This easter jello pie recipe shines because of its unforgettable sensory elements. The Starburst Pink Jell-O gives a tangy, candy-like punch, while purple grape or berry Jell-O brings depth. The whipped cream blends with each Jell-O layer, turning them silky and airy. And don’t skip the graham crust! Its toasty sweetness balances all that tart jelly delight. A tiny drop of food dye will make your pie camera-ready, totally Instagrammable for your festive spread.
Smart Substitutions + Health
For a gluten-free version, simply swap in gluten-free graham crackers. Dairy-free? Reach for coconut whipped topping instead of classic whipped cream to keep it light and creamy! If you want less sugar, try a sugar-free Jell-O for any, or all, layers. You could even introduce rainbow layers by doubling the Jell-O flavors, as long as you allow each to set slightly before layering. For a nutty Easter twist, a quick pecan or walnut crust also works deliciously, think of it as a spring remix on my homemade no-bake Twix bars base!
Step-by-Step Instructions
Detailed Steps with Tips
- Microwave the butter until fully melted and fragrant, but don’t let it brown.
- In a medium bowl, mix graham cracker crumbs with melted butter. Stir until the texture looks and feels like damp sand.
- Press the mixture firmly into the base and sides of a springform pan. The edges should be even for a polished look. Freeze while you prep your filling.
- Pour each flavor of Jell-O into a separate small bowl.
- To each bowl, add ¾ cup boiling water. Whisk until the powders dissolve completely for a clear, gem-like base.
- Next, stir in ⅓ cup cold water per bowl. Refrigerate all bowls for 20–30 minutes. They should thicken but remain pourable, think loose pudding, not Jell-O jigglers.
- Fold 4 ounces of whipped cream into each bowl with a spatula, turning every batch creamy and pastel. Add a drop or two of food coloring to pink and yellow, if you’d like brighter layers.
- Spread your first Jell-O layer onto the crust smoothly. Freeze 5 minutes until just set. This trick gives you those crisp, distinct lines between shades.
- Do the same with the other colors, layer, smooth, and freeze after each one. Work gently, so you don’t disturb underlayers.
- When all colors are stacked, freeze the whole pie 3 to 4 hours (or overnight) so the layers firm up for a tidy slice.
- Before serving, spread or pipe on the remaining whipped cream. Garnish with pastel sprinkles, jelly beans, or even edible flowers for a dazzling showpiece!
| Step | Active Time | Chill/Freeze Time |
|---|---|---|
| Prepare crust | 10 min | 15-30 min |
| Mix Jell-O & chill | 15 min | 20-30 min |
| Layer filling | 20 min | 3-4 hours |
| Add topping | 5 min | – |
Mistakes to Avoid
Rushing the chill times between layers can muddy the colors. It’s tempting to stack layers back-to-back, but for stunning definition, always freeze between each one for at least 5 minutes. Also, avoid overmixing whipped cream into the Jell-O, just fold gently until combined to keep your Easter Jello Pie ultra-light. Too cold or too hot water can cause Jell-O not to dissolve or set properly, so mind your temps! Finally, let the pie set fully before slicing to get clean, picture-perfect wedges.
Serving, Storing, and Variations
Creative Serving Suggestions
This easter jello pie recipe steals the show at brunch or as a vivid finale at dinner. Slice thick wedges and serve atop vintage china for a whimsical holiday look. For a party, cut the pie into small squares or bars for easy, colorful snacking. You can also pipe rosettes of whipped cream along the edges or sprinkle with pastel Easter candies, fresh berries, or edible flowers to wow your guests. Try serving alongside a platter of easy no-bake pecan praline cookies for an irresistible dessert buffet.
Storage Tips and Dietary Versions
Cover the pie tightly with plastic wrap and keep it in the fridge for up to 4 days. For a make-ahead option, freeze your assembled Easter Jello Pie Recipe without whipped topping for up to a month, then thaw and decorate right before serving. For a lighter option, try sugar-free Jell-O and swap in reduced-fat or coconut whipped topping. Plant-based eaters can swap graham crackers for gluten-free or nut-based crusts and use coconut whipped cream. For a fun, personal-sized variation, try layering your filling in glasses or jars for individual Easter parfaits.
FAQs
What’s in flapper pie?
Flapper pie is a classic Canadian dessert, traditionally made with a graham cracker crust, a creamy vanilla custard filling, and a generous layer of toasted meringue on top. Unlike the easter jello pie recipe, flapper pie is baked and custard-based rather than featuring no-bake, colorful Jell-O layers.
What is Easter pie called?
Easter pie can refer to different traditional dishes depending on heritage. In Italian-American families, it’s often called “Pizza Rustica” or “Pastiera,” featuring savory meats or sweetened ricotta. However, this easter jello pie recipe is a no-bake American favorite made with Jell-O, whipped cream, and graham crust, perfect for a springtime celebration!
How to make jello pudding pie filling?
To make Jell-O pudding pie filling, whisk together a package of instant Jell-O pudding and the recommended amount of cold milk (usually 2–2.5 cups). Whisk until thick, then pour into a prepared crust and chill until set. For the easter jello pie recipe, though, whipped cream is folded into cooled, thickened Jell-O layers instead of pudding.
How much milk do you use for a jello pudding pie?
Most Jell-O pudding pie recipes call for 2 to 2.5 cups of cold milk for a standard 3.4-ounce box. Always follow the box instructions for the right consistency. The easter jello pie recipe uses water and whipped cream for the filling, not milk, to achieve its signature fluffy layers.
Conclusion
I hope you feel inspired to brighten your holiday with this joyous easter jello pie recipe. Each pastel layer invites smiles, while every creamy bite unlocks a little childhood magic. With its effortless assembly and no-bake brilliance, it’s ideal for busy families or imaginative bakers wanting to add some color to spring. If you’re hungry for more festive treats, peek at my homemade no-bake Twix bars, a caramel lover’s dream. Gather your favorite Jell-O, clear space in your fridge, and bring a burst of color to your Easter table this year. Happy no-baking!
Print
Best Easter Jello Pie Recipe – Easy & Colorful Layers
- Total Time: 15 Minutes
- Yield: 8 Servings 1x
- Diet: Vegetarian
Description
This Easter Jello Pie Recipe is a rainbow-layered, no-bake crowd-pleaser with fluffy pastel Jello whipped into creamy heaven and nestled in a buttery graham crust, so festive for Easter and celebration season
Ingredients
½ package Pink Starburst Jell‑O (a little under 2 ounces)
1½ ounces Blue Jell‑O (½ Package)
1½ ounces Yellow Jell‑O (½ Package)
1½ ounces Purple Jell‑O (½ Package)
16 ounces Whipped Cream, divided
3 cups Boiling Water
1⅓ cup Cold Water, divided
Yellow Food Dye (optional)
Pink Food Dye (optional)
2½ cups Graham Cracker Crumbs
12 tbsp Butter (1½ sticks)
Instructions
1. Microwave the butter until fully melted.
2. In a medium bowl, stir together the graham cracker crumbs and melted butter until it resembles damp sand.
3. Press the crumb mixture into the bottom and up the sides of a springform pan, then place it in the freezer to chill.
4. Pour each color of Jell‑O powder into a separate small bowl.
5. Add ¾ cup boiling water to each bowl, stirring until the powder is completely dissolved.
6. Stir in ⅓ cup cold water to each bowl and chill in the fridge for 20–30 minutes until thickened but not set.
7. Mix 4 ounces of whipped cream into each Jell‑O bowl until smooth and creamy.
8. Add food coloring to the yellow and pink mixtures if you’d like to brighten the colors.
9. Spread your first color layer into the crust evenly, then freeze for 5 minutes.
10. Repeat with the remaining colors, freezing 5 minutes between each to keep the layers clean.
11. Freeze the finished pie for 3–4 hours until firm.
12. Top with the remaining whipped cream just before serving, and enjoy!
Notes
Store leftovers covered in the fridge for up to 4 days.
Make‑ahead tip: assemble up to the final freeze a day ahead; decorate just before serving.
Use food dye to boost pastel tones—especially yellow and pink layers.
If colors start to blend, give each layer an extra chill in the freezer.
- Prep Time: 15 Minutes
- Category: Dessert
- Method: No Bake
- Cuisine: American
Nutrition
- Calories: 497
- Sugar: 29
- Sodium: 445
- Fat: 32
- Saturated Fat: 19
- Unsaturated Fat: 10
- Trans Fat: 1
- Carbohydrates: 48
- Fiber: 1
- Protein: 6
- Cholesterol: 88

